Hello, lovely reader! Whether you’re a familiar face around here or you’ve landed here while hunting for answers about your patio, you’re in just the right place. Today we will learn what’s the best way to clean an Indian sandstone patio?… and do it right!!
We’re feeling pretty lucky… our highly trained technicians worked their magic on a customer’s stunning Indian sandstone patio. Honestly, it’s a beauty. You’ll see the before and after shots further down, and they speak for themselves!
We know your time is precious, and if you’re simply here for the best way to clean your Indian sandstone patio, we’ve got you. Whether you’re planning to do it yourself or just curious about our professional process, everything you need is below.
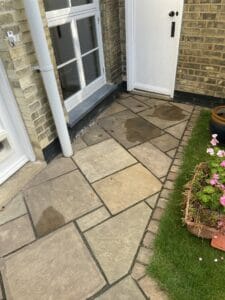
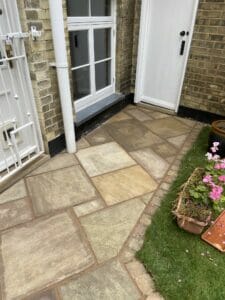
A little peek at what’s possible…

Gorgeous, right? A freshly cleaned sandstone patio can completely transform your outdoor space… and with BBQ season just around the corner, now is the most perfect time to give yours a refresh!
Our cleaning process:
In this section, I will write our process, but there will also be a video so you can see our process. Sometimes a visual is better, so for those who like to see it, check out the end of this section.
Why it’s so important to clean Indian sandstone the right way
Indian sandstone is naturally porous and full of character… but that also makes it more prone to staining, algae growth, and weather wear. Using the wrong cleaner or too much pressure can easily damage the surface or strip away that beautiful natural finish.
So, let’s walk through our expert process and give you a side-by-side of how you could adapt it at home if you’re going DIY.
Our professional patio cleaning process (and your at-home version too)
We’ve got two main methods in our toolkit: Clean, Sand & Seal and Clean, Point & Seal. For Indian sandstone, we go with Clean, Point & Seal… it’s the gentler but more detailed method, perfect for protecting and restoring this type of patio.
Here’s how it breaks down:
Step 1: The pressure wash
Our way:
We use a powerful petrol-run jet wash that gets up to 1000 psi — it blasts through grime and moss without damaging the stone.
Your way:
Your home pressure washer probably sits around 350–400 psi, which is fine… just be patient and take your time. Start with a gentle setting to avoid damage.
Step 2: Big surface coverage
Our way:
We rotate between a turbo lance and a surface spinner depending on the area, getting into every nook.
Your way:
You might want to attach a patio cleaning head to your pressure washer or use a stiff brush with your cleaning solution to help loosen stubborn bits.
Step 3: Eco-friendly cleaning solution
Our way:
We apply a specially formulated eco-cleaner that’s safe for pets, plants, and our lovely local wildlife… but still strong enough to break through patio grime.
Your way:
You’ll likely use a supermarket-bought cleaner… just double-check it’s non-acidic and sandstone-safe. Acidic products can leave marks or damage the slabs. Always test a small area first!
Step 4: Tackling black spots and stubborn stains
Our way:
When the pressure washing isn’t enough, we bring in the big guns… sodium hypochlorite. It gently breaks down the bacteria and algae that cause those pesky black spots. We let it sit, sometimes up to an hour, and give it a thorough rinse. (Psst… sunny days help it work even better!)
Your way:
You can try a diluted bleach-based cleaner… but please be super careful. Use the right PPE, and avoid runoff into garden beds or drains. Nature will thank you!
Step 5: Repointing and sealing
Our way:
We use Easy Joint, which gets brushed into all the gaps for a clean, elegant finish. Then we apply a sandstone-appropriate sealant to protect it all… this keeps the patio looking newer for longer and helps with future cleans.
Your way:
You can buy Easy Joint online or in-store… just make sure it’s the right colour for your slabs. Take your time, follow the instructions, and finish it all with a good-quality sealant.
🎥 See us in action!
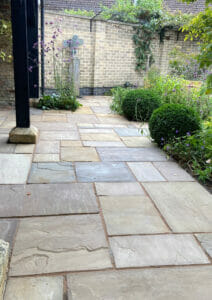
Here’s one we did earlier…
We couldn’t be prouder of this job… it turned out beautifully. Big thanks to our brilliant customer for letting us share it. Our trained technicians worked carefully and thoroughly to bring the patio back to life, giving it a finish that’s ready to shine through every season.
Before After


5 top tips for keeping your sandstone patio looking fabulous all winter
- Brush regularly – Keep on top of leaves and debris so they don’t settle and stain.
- Scrape weeds as they pop up – The sooner, the better!
- Top up your joints – Especially after a pressure wash, replacing jointing sand helps keep weeds out.
- Use mild, acid-free soapy water – Great for little spot cleans between bigger jobs.
- Stiff brush magic – A good stiff-bristle brush can freshen up areas without pressure washing.
Want to know more about Easy Joint?
We’ve got a whole blog on the stuff… including what colours we use and why.
To find your local patio and driveway cleaners, check this out:
Maybe you would like to see some reviews:
And last but not least, just because I like to help if you would like to see the cost of a professional clean, then this is perfect for you:
And that’s a wrap!… I hope I helped you with your patio-cleaning query and gave you a bit of confidence whether you’re hiring the pros or having a go yourself.
Thanks you so much for reading… and please don’t forget, we’re always here if you need a hand or a friendly nudge in the right direction. Have a fab day, and happy patio pampering! ☕🧽🌿